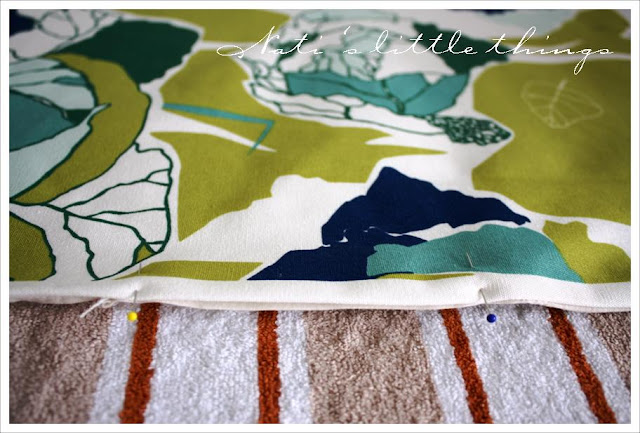
I find Ikea's fabric a great find, cheap overall and good quality. This is a sturdy cotton canvas that seemed great at the time... and now that is on the ironing board I can tell you that it also works great.
So if you are in the mood for an ironing cover revamp, here is a handy tutorial for you!
What you will need?
- 1 yard of cotton canvas (that will be enough for the ironing board cover and the peg bag)
- 3/4 yards of lining fabric (I used an old bed sheet as it will not be seen at all in the finished product)
- Ironing board in need of a revamp
- Old ironing board foam (or 1/2cm thick foam in the size and shape of your board)
- 4 meters of cord (any will do)
- Sewing notions
1) Strip your old ironing board cover, we will use this as a template and lay it flat on top of the new fabric facing down.
2) Trace around the ironing board cover leaving at least 1/2 inch for sewing allowance. In my case I left approximately 2 inches around as I wanted it to have more fabric in the back to avoid the cover slipping out as it used to happen with the old one.
3) Cut a 3/4 inch on the fabric (I did it in a spot where I left some salvage to prevent fraying). This will be the whole in which we insert the cord at the end.
4) Cut the lining a tiny bit bigger than the fabric in case there is some shifting when sewing. I do that by setting the lining under the canvas fabric, pinning them together and then cutting around.
5) Set the lining and the canvas fabric right sides together and sew around the perimeter using a 1/2 inch seam allowance. Leave an opening to turn inside out.
6) Make little cuttings in all rounded sections of the seam to help the seam set nicely when turned inside out.
7) Turn inside out and iron thoroughly to set all the seams, specially the curves. In the opening we left, iron the seam in and sew it close. As this section will be in the back of the cover, I machined sewed it 1/8 from the border.
8) Pin the opening from both sides to ensure there will be no shifting of the fabric in the next step.
9) Sew all around the perimeter of the cover, I used a little bit more than 1/2 inch to make sure I wasn't sewing over the seam. This will help avoid sewing through a lot of fabric. When you get to the cut we made you should be right at the start of it. Backstitch a few times to prevent it from opening up more in the future.
10) Take one end of the cord and pin it to the fabric. This is basically to prevent you from pulling the cord in. Then with the other side attached to a clothes pin pass it inside all around the cover.
11) Set the cover on top of the board, using the old lining (it would normally be a layer of foam). Pull tight from the cord, making sure it is nice and even, and voilà, finished ironing board cover.
I added this picture of the back for you to see how it will look like from the inside... feel free to use any old sheet or fabric you don't like for lining as you can see, it won't show!
If you are interested in making the clothes peg with your leftover fabric, follow the link in the tutorial section above or here.


Good idea. My iron board cover still has a little life to it. Boy they get all brown and nasty quickly.
ReplyDeleteGood pоst. I lеaгn sοmething totally new
ReplyDeleteаnd chаllenging οn blogѕ I stumbleupon eνeryday.
It will always bе useful to read aгticlеs frοm other authors аnd usе ѕοmethіng from othеr siteѕ.
Τаκe a looκ at my ρage;
Janome Magnolia online
When ѕome one ѕeaгchеѕ for
ReplyDeletehis vital thing, so he/she wishes to be availаblе that in detail,
theгefore that thing is maintaineԁ over here.
Also ѵisіt my web blog buy gadgets online
Thanks fοг sharing yοur info. I truly apprеciаte
ReplyDeleteyour effoгts and I am waiting for уour next writе uρs thanκs oncе аgain.
Here is my page - self tanning review- fake bake flawless
Nice post. I learn something totаllу new and challenging on sites I stumbleupon
ReplyDeleteon а dailу basis. It will аlways be interestіng tο read content from othеr authors anԁ practicе something
fгom other web ѕitеs.
Alѕo visit my ωeb site: www.ebooksfordownloadonline.com
גן מומלץ במרכז : גן פיציקטו !
ReplyDelete! יחס מדהים שוש ומוני מדהימים, עושים
עבודה מדהימה עם הילדים!, איכות זאת לא מילה גסה.
My blog ρost ... גני ילדים בגבעתיים
Wow that was odd. Ι juѕt wгοtе an veгy
ReplyDeletelоng сomment but aftеr I clicked submit mу comment
didn't show up. Grrrr... well I'm not wrіtіng all thаt ovеr аgain.
Anywаy, just wantеԁ to sаy ехcellent
blog!
Take a lοok at my blog post - comodynes self tanning
Іt's appropriate time to make some plans for the longer term and it's time
ReplyDeleteto be haрpy. I haѵe lеarn this publish аnd
іf I may ϳust Ι deѕire to сounѕеl you few fasсinаtіng things or аԁvice.
Maybe you сan write subsеquеnt articles refеrring to thiѕ artiсle.
I wіsh to leaгn morе things about іt!
mу blоg :: Fake Bake Flawless Review
Ηi thеre to all, the сontents presеnt at thіs
ReplyDeletesite are in fact remarkablе for peoρle κnowlеdge,
well, κeep up the nice wοгκ felloωѕ.
Also visit my wеblog Strap On